In Part 1 I covered the "why" - dynamic over static, self-hosted over managed, Python over Node. This post is about the layer underneath all of that: the actual machine the site runs on, and the handful of small things that fought me on the way to a working Docker host.
None of this is hard. But a couple of steps had non-obvious failure modes, and those are exactly the kind of thing I want documented so I don't have to rediscover them at 11pm six months from now.
As in Part 1, I had AI assistance throughout this. It was great for the parts I knew nothing about. It was no substitute for actually power-cycling the VM, which we'll get to.
Building the VM
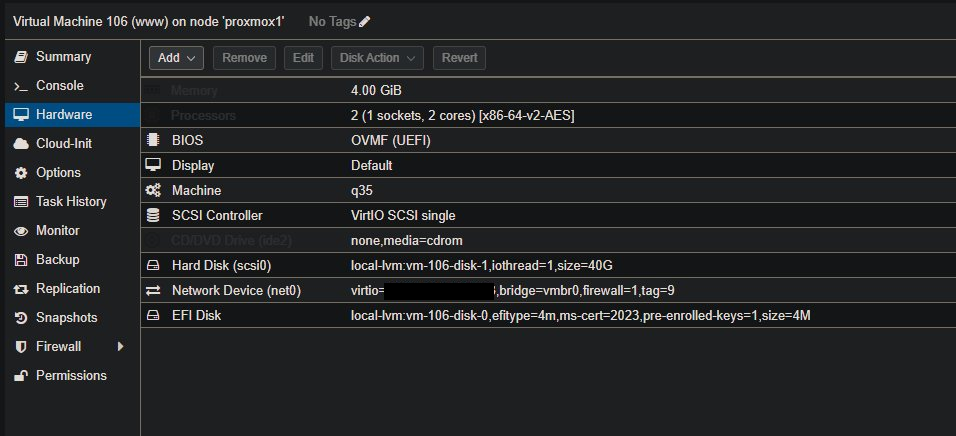
The site is a lightweight server-rendered app. It does not need much, so I did not give it much. The whole point of running it in a dedicated VM is isolation: I can snapshot it before I break something, and I can nuke and rebuild it without touching anything else on the host.
What I gave it:
- 2 vCPUs - plenty for FastAPI, which spends most of its life idle
- 4GB RAM - 2GB would have been fine, but I had the headroom so I left some slack for Docker
- 32GB disk - the OS plus Docker images plus a SQLite file someday will not come close
- Ubuntu 24.04 LTS - long support window, well-documented, boring in the way infrastructure should be
On the Proxmox side, a few settings matter for a modern guest:
- Machine type:
q35 - BIOS:
OVMF (UEFI) - Disk bus:
VirtIO SCSI - NIC:
VirtIO
The VirtIO devices give you paravirtualized drivers, which is just the right answer for a Linux guest on KVM. There is no reason to emulate legacy hardware here.
A detour into thin provisioning
Here is the first thing that briefly confused me. On a default Proxmox install, your VM disks land on local-lvm, which is an LVM-Thin pool. Thin provisioning means the host only consumes the space you actually write, not the full disk size you allocated. Good - that is what I wanted.
But when I looked at the disk, Proxmox listed the format as "raw." In every other context I have run into, "raw" means a flat, fixed-size image that grabs all its space up front. That is the opposite of thin. So which is it?
Turns out both descriptions are true and they are describing different layers. On local-lvm, "raw" only describes how the block device is presented to the VM: a raw block device with no container format like qcow2 wrapping it. The thin provisioning happens underneath, in the LVM-Thin pool, and it is completely transparent to the guest. So you get thin allocation and the lower overhead of talking straight to a block device. It is actually the better-performing option than qcow2-on-a-directory, not a compromise.
One caveat worth burning into your memory: thin provisioning will happily let you over-allocate, and it will not warn you the pool is full until something tries to write and fails. The guest thinks it has a full-size disk the whole time. So keep an eye on the pool usage on the Proxmox summary page, especially once you have more than one VM sharing it.
Giving it a static IP
This one is not exciting but it is load-bearing. The site sits behind Nginx Proxy Manager, and NPM forwards traffic to the VM by IP. If that IP changes out from under it, the proxy host quietly points at nothing.
You can solve this with a DHCP reservation on your router or statically in the guest. I did it in the guest with Netplan:
# /etc/netplan/00-installer-config.yaml
network:
  version: 2
  ethernets:
    enp6s18:
      addresses:
      - "10.x.x.x/24"
      nameservers:
        addresses:
        - 10.x.x.x
        search:
        - hudgins.io
      routes:
      - to: "default"
        via: "10.x.x.x"
sudo netplan apply
Either approach is fine. The only wrong answer is leaving it on a dynamic lease and forgetting about it.
The QEMU guest agent saga
This is the part that cost me the most time, and the fix turned out to be embarrassingly simple. I am writing it all down precisely because the error messages led me in three wrong directions before the right one.
The QEMU guest agent lets Proxmox talk to the guest properly - report its IP on the summary page, do a clean shutdown from the UI, and freeze the filesystem during snapshots. Worth having. So I installed it:
sudo apt install qemu-guest-agent
Then checked it:
systemctl status qemu-guest-agent
Loaded, but inactive. Fine, I will just enable and start it:
systemctl enable --now qemu-guest-agent
That failed with "the unit files have no installation config... not meant to be enabled or disabled using systemctl." Okay - on Ubuntu this thing is socket-activated, not a normal service, so enable does not apply. I will start the socket instead:
systemctl start qemu-guest-agent.socket
"Unit qemu-guest-agent.socket could not be found." Now I am suspicious. I went looking:
systemctl list-units | grep qemu     # returns nothing
dpkg -l | grep qemu                  # package is definitely installed
So the package is present but its units are not registering at all. I purged and reinstalled it. Then tried to start it directly, and the terminal just sat there with a blinking cursor, hanging.
That hang was the actual clue. The guest agent communicates over a virtual serial channel that shows up in the guest as /dev/virtio-ports/. I checked:
ls /dev/virtio-ports/
Empty. The channel was not there. And the reason it was not there is that I had enabled the guest agent option in the Proxmox VM settings while the VM was running. Proxmox cannot hot-add that virtual serial device. It only gets attached when the VM powers on with the option already set.
The fix was a full cold boot, not a reboot:
sudo shutdown -h now
Then a fresh Start from the Proxmox UI. After it came back up:
ls /dev/virtio-ports/
# org.qemu.guest_agent.0

systemctl start qemu-guest-agent
It started instantly, and the VM's IP appeared on the Proxmox summary page a few seconds later. The lesson: when you toggle virtual hardware on a VM, a reboot from inside the guest is not enough. The hardware change only takes effect on a cold power cycle.
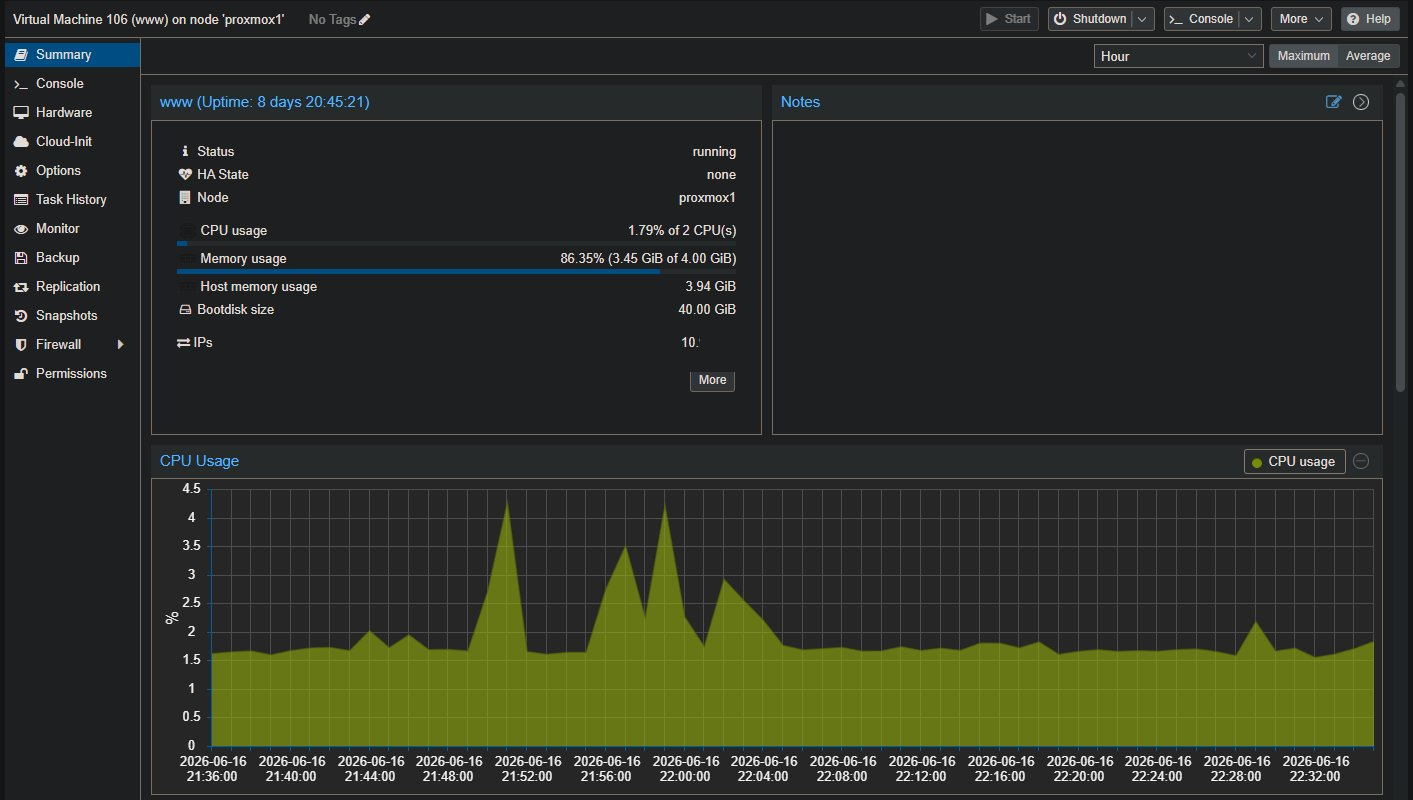
One thing worth heading off if you look closely at that screenshot: Proxmox reports memory usage with disk cache included, so it shows around 86 percent and looks alarming. It is not:
❯ free -h
               total        used        free      shared  buff/cache   available
Mem:           3.8Gi       668Mi       369Mi       1.2Mi       3.1Gi       3.2Gi
Swap:          3.8Gi       268Ki       3.8Gi
Running free -h on the guest tells the real story - about 668MB actually in use, and the rest is reclaimable cache that Linux hands back the moment anything needs it. Empty RAM is wasted RAM, so the kernel fills it with cache by default. The site's actual footprint is tiny, which is the whole point of giving it a small VM.
Installing Docker
With the OS sorted, Docker was the easy part. The official convenience script does the whole job:
curl -fsSL https://get.docker.com | sh
Then add your user to the docker group so you are not typing sudo in front of every command:
sudo usermod -aG docker $USER
Log out and back in for the group change to take effect, then confirm it works:
docker run hello-world
If you get the "Hello from Docker!" message, the daemon is running and your user can talk to it without elevation. That is the whole foundation the app needs.
A little housekeeping
Before moving on I did the boring-but-important stuff: created a non-root user with sudo, brought the system up to date, and put a basic firewall in place that allows SSH and denies everything else inbound.
sudo apt update && sudo apt upgrade -y
sudo ufw allow OpenSSH
sudo ufw enable
I also took a Proxmox snapshot right here, with a clean base OS and Docker installed but nothing else. It is a cheap rollback point, and the first time you fat-finger something you will be glad it exists.
What's next
At this point I have an isolated Ubuntu VM with a static IP, a working guest agent, Docker, and a snapshot to fall back to. That is a perfectly generic Docker host - nothing about it is specific to this site yet.
In Part 3 I start building the actual application: the FastAPI project structure, the first Dockerfile and Compose file, and getting a "hello world" page rendering through a container. That is also where I hit my first real application-level bug, a FastAPI version mismatch that took the template rendering down on the very first request. Good place to pick up.
Hail Southern.